pytorch모델을 onnx 모델로의 변환
pytorch 모델을 tensorrt로 변환하기 위해서는 pytorch 모델을 onnx로 변환을 해야 하는 단계를 거쳐야 하는데, 변환을 할 때 batch를 원하는 size로 고정을 할 수도 있고 dynamic batch로 설정해 줄 수도 있다.
onnx모델로의 변환 순서
onnx 모델로 변환하기 위해서는 기본적으로
1. 변환하고 싶은 pytorch model load
2. input tensor 설정
3. input, output name 설정
4. dynamic_axes 설정 (dynamic batch로 할 경우)
5. export
의 순서로 설정해서 변환해 주면 된다.
그리고 export할 때 여러가지 option을 할 수 있는데 아래의 링크 중간에 참고하면 된다.
https://pytorch.org/tutorials/advanced/super_resolution_with_onnxruntime.html
(optional) Exporting a Model from PyTorch to ONNX and Running it using ONNX Runtime — PyTorch Tutorials 1.10.0+cu102 documenta
Note Click here to download the full example code (optional) Exporting a Model from PyTorch to ONNX and Running it using ONNX Runtime In this tutorial, we describe how to convert a model defined in PyTorch into the ONNX format and then run it with ONNX Run
pytorch.org
만약 모델이 잘 변환되었는지 직접 보고 싶으면 밑에 링크에 model을 올리면 model의 structure을 visualize해주니까 확인해 보면 된다.
Netron
netron.app
고정된 batch size의 onnx 모델
고정된 batch size의 onnx모델로 변환하는 방법은 input tensor의 shape을 넣어줄 때 원하는 size의 batch를 설정해서 export해주면 끝이다.
모델은 기본적으로 pytorch에서 제공해 주는 resnet18을 load했고, 생성될 onnx 모델의 이름, input과 output 이름, 그리고 input tensor를 원하는 shape로 생성하여 설정했다.
from __future__ import print_function
import os
import torch
import torchvision.models as models

net = models.resnet18(pretrained=True)
net.eval()
print('Finished loading model!')
device = torch.device("cuda:0")
net = net.to(device)

output_onnx = 'test_batch2.onnx'
input_names = ["input_0"]
output_names = ["output_0"]

inputs = torch.randn(2, 3, 256, 256).to(device)

torch_out = torch.onnx._export(net, inputs, output_onnx, export_params=True, verbose=False,
                                   input_names=input_names, output_names=output_names, opset_version=11)
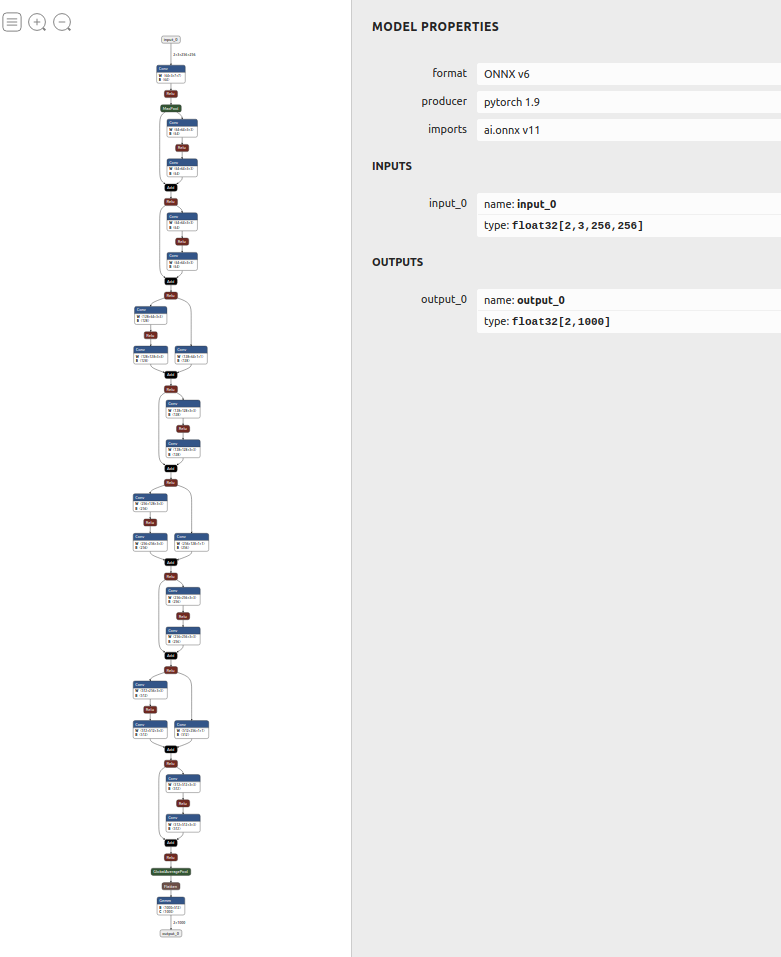
위의 코드는 batch size를 2로 설정을 해서 변환을 하였고, 변환된 모델을 확인해 보면 다음과 같이 input의 shape가 [2, 3, 256, 256]으로 되어 있는 것을 확인할 수 있다.
dynamic batch의 onnx 모델
dynamic batch로 설정하고 싶으면 export모델을 사용할 때 option에 dynamic_axes를 설정해 주면 된다.
dynamic_axes를 설정해 주는 것 말고 위와 같기 때문에 모델과 output 이름 등등은 같게 설정하였다.
from __future__ import print_function
import os
import argparse
import torch
import torchvision.models as models

net = models.resnet18(pretrained=True)
net.eval()
print('Finished loading model!')
device = torch.device("cuda:0")
net = net.to(device)

output_onnx = 'test_dynamic.onnx'
input_names = ["input_0"]
output_names = ["output_0"]
inputs = torch.randn(1, 3, 256, 256).to(device)
print(net(inputs))

dynamic_axes = {'input_0' : {0 : 'batch_size'},
                    'output_0' : {0 : 'batch_size'}}

torch_out = torch.onnx._export(net, inputs, output_onnx, export_params=True, verbose=False,
                              input_names=input_names, output_names=output_names,
                              opset_version=11, dynamic_axes = dynamic_axes)

print(torch_out)
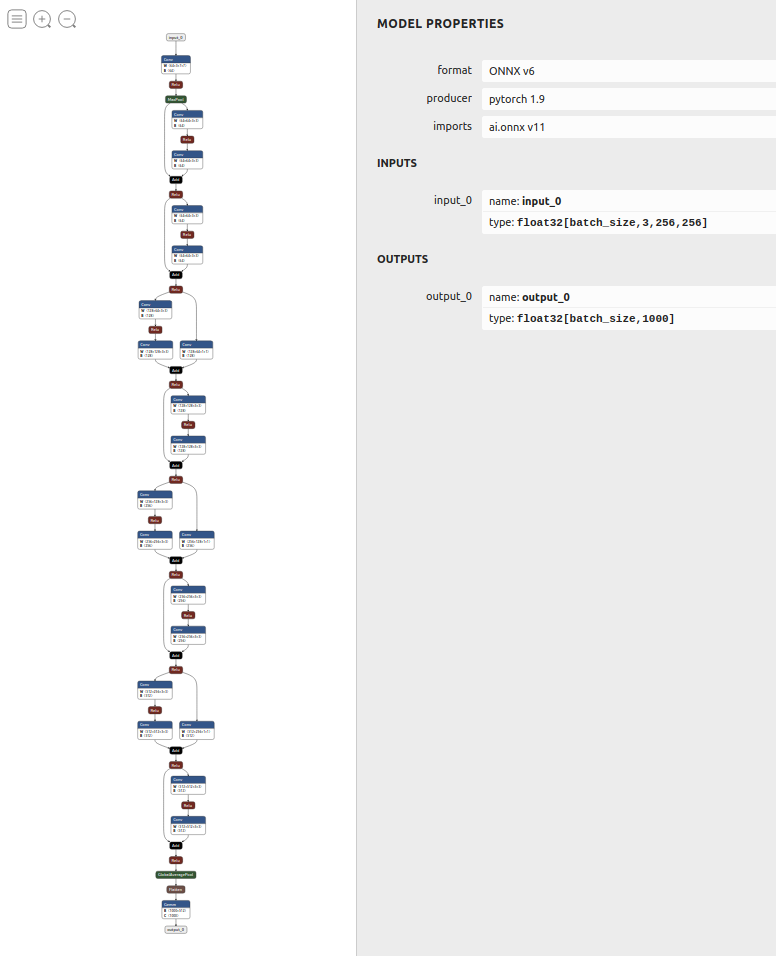
만약 dynamic batch를 위해 dynamic_axes를 사용할 경우 input tensor의 shape 설정에서 batch를 몇으로 설정을 하던밑의 그림과 같이 input tensor의 shape는 [batch_size, 3, 256, 256]으로 뜨게 된다.
'Development > Pytorch' 카테고리의 다른 글
| deepspeed를 이용하여 pytorch 모델 학습 방법 (5) | 2023.04.27 |
|---|---|
| [Pytorch] CUDA error: CUBLAS_STATUS_INVALID_VALUE when calling `cublasSgemm (0) | 2022.12.14 |
| [Pytorch]docker container에서 pytorch memory error (0) | 2021.09.16 |


댓글